

One of our key design requirements was to make a gourmet kitchen. Another was to bring the outside in. Today we want to share what has become the center of our design, the feature around which the rest evolved, and perhaps one of the most distinctive elements of our Tiny Home. Yes, it is the 12′ wide open window door combination. It allowed us to take this Tiny Home kitchen and open it up to the HUGE outdoors.
We had seen folding glass windows as well as folding glass doors. There were even some very innovative uses of a glass paneled garage door to open the tiny interior to the vast outdoors. But it was this unique combination of windows and doors working seamlessly together that truly inspired us.


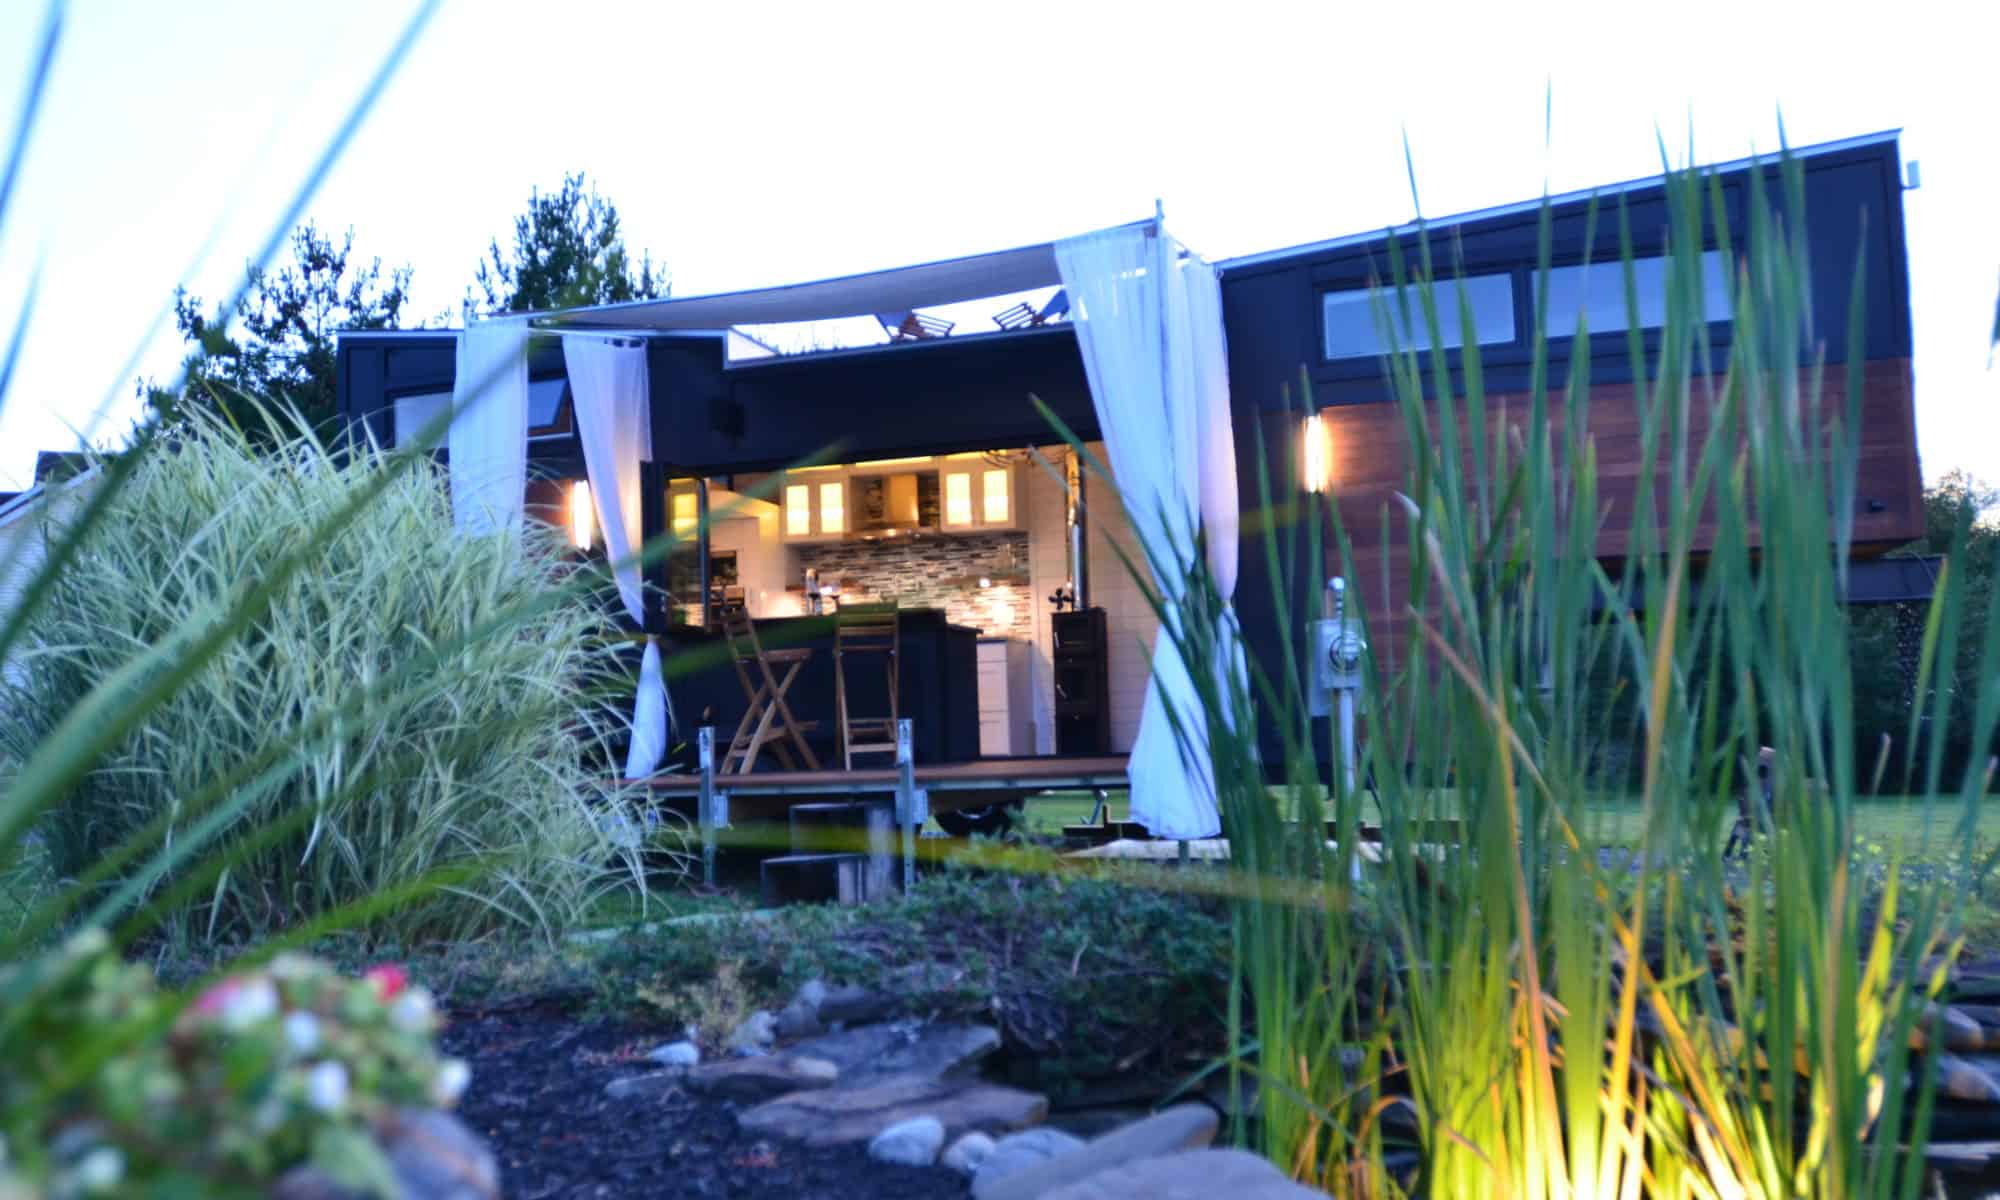
The pictures here show it opened and closed. It is an approximately 12ft (3.66m) wide unit split in half doors (to the right) and windows (to the left). A key feature is that there is no center post when it is opened, leaving a completely unobstructed view.
This was not without its challenges. First we had to find the right supplier. After some research we identified several top notch companies that engineered some very impressive bifold units. We progressed with one at a time for several weeks until for some reason or another (legal Dept worried about liability of units in moving unit, design not capable of handling potential bumps in the road, won’t be able to handle this new design in 2018, etc.) they backed out. We went through this for a couple of months and then decided to design our own. A simple two door two window design with two way hinges should do the trick. We even found a custom door designer that was willing to create a door from our idea, but their legal department also said no warranty. For what they wanted to charge, sorry, no go.
So there we were, add custom door and window manufacturing to the to do list.
One evening, before we ventured into this new endeavor, we did one more desperate search. Julia found this fairly obscure, but promising provider out of Florida. A call the next morning revealed that they were the US arm of a German manufacturer, Sunflex and they said they were up for the challenge. They made sure to incorporate steel bearings and heavy duty parts at any stress points. They even offered triple pane glass for extra strength and insulation.
That this was a well engineered product was evident. It was shipped by boat from Europe and when it arrived even the packaging was impressive.

 Secondly, making sure the structure could accommodate this wide span with a deck on top was not trivial. This is where our selection of Volstrukt and their agile steel framing paid major dividends again. They were able to design all the right supports and reinforcements necessary to make this a perfect fit. Tiny Home Builders, provider of our trailer, also came up huge by working with us to get the necessary steel beam to allow for that large opening.
We love how it all turned out and this picture taken from the inside really shows it off well. We are doing our best in making this tiny home HUGE. It is Tiny Living Living Large.

Next up is the metal roof, incorporating the various vents and our roof top window.
Cheers for now.


 We started down the traditional route of stick building using traditional 2×4 dimensional lumber. This is by far the most common approach. If we needed help to build, most any local framer would be experienced in wood. It is also the least expensive choice. However, it is heavy. And it will take us some time to build, even if it is just a small tiny house. It will also take considerable care to ensure that the structural integrity is intact, especially given the fact that it will be exposed to hurricane winds. Also, let’s not forget the rooftop deck, you may remember from our design, which will need to withstand hundreds of pounds/kilos.
 made of expanded polystyrene (EPS), extruded polystyrene (XPS) or rigid polyurethane foam density insulation. The manufacturer constructs the entire home and then disassembles it and ships it for an easy build on site. The main advantages, from our perspective, were very high insulation values (as high as r-27 in a 4″ wall), strong structural integrity, and the ease at which we could build the frame of the house. This solution was slightly lighter than the pure stick-build but the most expensive option. Another challenge with this option is the extra work needed to route electrical wires and plumbing as the walls are solid foam. There are workarounds, but in the end we decided against it.
 applications all the time, but not so often in residential. It is definitely more expensive than the stick build route and finding local experienced help is not going to be as easy. However, we found these challenges were definitely overcome by its benefits. The number one reason we choose this path was due to weight and structural integrity. By our estimates, we can save close to 3,000 lbs (1,360 kg) versus the stick build. This includes using the lightweight and insulating foam sheeting on the outside. A significant factor to making this home as lightweight as possible. It is also stronger than any of the other options, easy to assemble as it also comes in prebuilt sections, and completely impervious to moisture, bugs, etc. We were sold!
 So here it is. The initial look of our design. A contemporary, clean look that incorporates our many requirements. Siding is cedar (the reddish parts) and the rest is trimmed in cedar with metal panels. When we arrive at our destination, we will unhook the truck from the house and attach cedar panel skirts underneath the gooseneck creating a tiny garage for our bikes and additional equipment. In this first view, you can see the two decks, including the rooftop. We placed solar panels on the top as well as a rooftop access window that opens up fully for easy access. The main deck is 15’x8′ (4.6m by 2.4m) and is stored in two sections under the trailer during travel.
 Here is a view of the kitchen from the outside.
 This top view will give you a glance of the inside. The master bedroom is over on the right, just a few steps up a stairway. We have plenty of closet space and drawers. The reading loft also has a few more steps on it that leads to the rooftop deck. Kitchen is in the center of the home with a full size panel ready refrigerator/freezer, top of the line stove, convection oven, hood, and wood burning stove/oven combination. Adjacent to the stove is a panel ready dishwasher, farmer’s sink, and wine rack. At the other end is a sleeping loft and underneath that is a full size bathroom and laundry area.
 This shows the view from the sleeping loft across the kitchen to the living/office/dining/sleeping room. Yes this space will have multiple uses with transformational furniture, hidden features in the wall, etc.
